Building the LT1 H-Body
By
Dave English
Purpose
I
wanted to document as much as possible about putting a Gen II LT1 Small Block
engine into an H-body car. These engines are becoming more popular,
plentiful, and affordable for street rodders and racers,
and I believe they provide an excellent combination of performance, economy,
low emissions, and driveability. Although Tim
McCabe pioneered this area by putting a modern
I should also add that I didn’t have nearly the mechanical know-how, equipment, or fabricating skill that many of you have when I started this project. When I tell you what something costs, please realize I’m not trying to impress anyone. Quite the contrary—I wish I could have done more work myself, but I lacked the time (away from home over 16 days a month flying for UPS and Air Force Reserve), skill, and tools to do a proper job. I also wish someone could have told me what this project was going to cost before I started the job. I have picked your collective brains, read, and done research on what I want done on my car. I turn some wrenches myself, but I have had to farm out most of the heavy work to a couple of racing shops in my hometown. The more you can do yourself, the better. Also, I will not go into much detail on some of the conversion issues already well-documented elsewhere, like using parts from a 7.5” S-10 rear end to build a rear for my car. I will tell you where to find this information and provide an Internet link whenever possible.
Take this for what it is—what I went through to build a modern Pro Touring Vega with an EFI engine setup and make it run.
Background and History
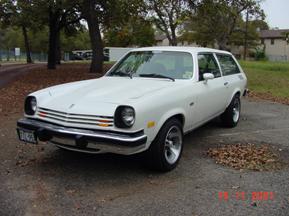
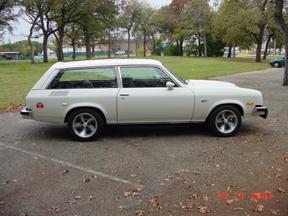
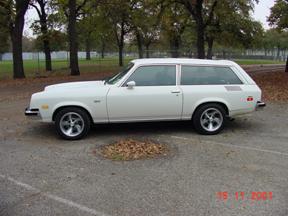
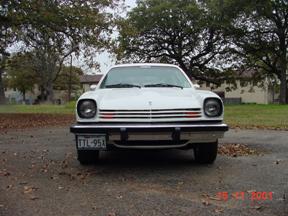
My car is a white Kammback that rolled off the assembly line in February 1976
according to the build sheet. My late father-in-law purchased it new for
my mother-in-law as a daily driver. She eventually passed it to her two
high-school daughters. My wife learned to drive in this car, and it was
her “drive to work” car when we met. (Her other car was a ’90 TPI ‘Vette.) Maybe that’s what attracted me to her—the
Vega, not the ‘Vette, since I had a nearly identical
blue one I drove in college and Air Force pilot training from 1976-1981.
We kept the car after we got married until her sister wanted it as a daily
driver while attending graduate school. When she completed her studies, I
wanted the car back as an “airport car” in
Originally my project was going to be in two phases—first, restore the car and convert it to a Vega GT clone; then do the engine swap the following summer. It didn’t turn out that way. I had been planning to use either a HO-350 ZZ-4 or a built-up Goodwrench 350 crate motor when I found a guy selling a low-mileage ’96 LT1 from a wrecked Z-28 for $1800.00. I decided to buy it and put it aside until I was ready for phase two. While debating transmission options, I found a recently rebuilt 700R4 from a wrecked ’86 Suburban I was able to pick up for $350.00. This is a proven combination for numerous LT1 conversions, and some of the HBOA folks have already swapped the 700 slushbox, notably Denis St. Pierre. I got Monza V-8 engine and tranny mounts from Butch Davis. So I had all the big pieces to start, but wasn’t planning on pulling the 4-banger until at least summer, 2001. I had already upgraded to a front suspension from a ’78 Sunbird wagon with deep-pocket lower A-arms, spindles and vented disks, V-6 front springs, a Flaming River quick-ratio aluminum steering box, new front shocks, new Moog CC-617 variable rate rear springs, front and rear anti-sway bars with poly bushings, and 13 x 6” GT rims. My interior contained a GT dash with a Cosworth tach and speedo provided by Tom “the Astre” Lippert, a mix of aftermarket mechanical and stock electrical gauges, fully functioning idiot lights, an AM/FM 4 speaker Cassette deck from the same ’86 Suburban the tranny came from that looks like factory stock, restored black plastic interior panels, GT steering wheel, black vinyl “pin-hole” pattern seats from a ’73 Vega (provided by Butch), new carpet, a Monza full-console (possibly a Vega option in ’77?), and new door seals from Soff-Seal. I replaced the original doors and hood with a rust-free set I pulled at the local wrecking yard and added new window belt rubber from J.C. Whitney. The exterior got dual sport mirrors and GT rocker mouldings. I also rust treated every vulnerable area with POR-15 rust preventative paint. Truly a bitchin’ ride, except under the hood.
I
finished the restoration and GT conversion on a Sunday in October 2000; then
decided to drive the car on a four-hour run to
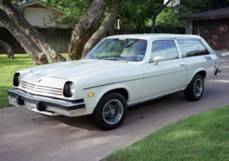
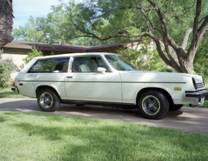
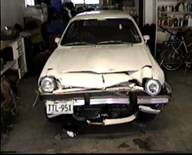
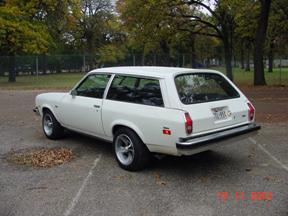
Converted and restored Vega GT Wagon: Before and after
Conversion
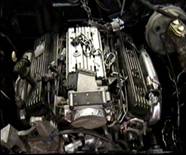
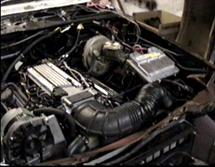
LT1 Gen II Small Block Chevy
The LT1 was introduced in the ’92 Corvette and subsequently used in the ’93-‘97 Camaro and Firebird. It was designed to have a very low profile under the hood compared to the earlier Tuned Port Chevy small block. It features aluminum heads and EFI manifold, a roller cam, one-piece rear main seal, and a cast-iron block. Unusual features are the camshaft-driven water pump with no mechanical fan pulley; reverse flow cooling, and Opti-Spark electronic distributor mounted behind the water pump. Reverse flow cooling means water from the radiator flows to the cylinder head passages first, then to the block. This allows the LT1 to use a relatively high compression ratio of 10.5:1 on pump gas without experiencing detonation problems. Two excellent articles describing the engine in more detail are attached to the end of this document: one describing the cooling system and a second one dealing with rebuilding the LT1.
The pros of using this engine in an H-body conversion are:
- Excellent performance in stock configuration: 285-300 HP
- Excellent mileage- 20+ MPG highway
- Smooth running and dependable due to EFI
- Cool running engine due to reverse-flow cooling
- Low deck height for under-hood clearance
- Over 100 pounds lighter than all cast-iron engine—525 pounds with accessories
- Camaro/Firebird oil pan is notched like aftermarket H-body pan
- Same dimensions as SBC with short water pump from bell housing flange to front of LT1 water pump—27 ½ ”
- Mounts like standard SBC engine
- Can use any transmission combination
- Flat torque curve throughout the RPM range
Cons of the LT1 conversion are:
- Need to use electric fan(s) due to lack of mechanical fan
- Limited clearance in front of water pump for both radiator and fan(s)
- Need to use either pusher fan (less efficient) or radiator in front of core support with remote fill
- Wiring integration
- Must use aftermarket (expensive!) or fabricated serpentine accessory drive belt system
- May have to use spacers to raise engine for pan clearance when using V-8 Monza mounts
- You can get equal or better HP/Torque out of a Gen I SBC with a carburetor
Fit and Clearance- Engine
Once
the car came back from the frame shop, the first step involved pulling the old
engine and test-fitting the new one. Ron from Lone Star Chassis
Fabricators, of
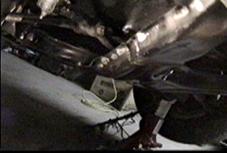
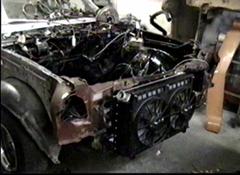
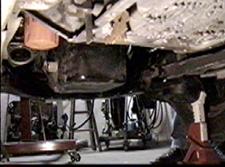
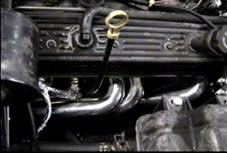
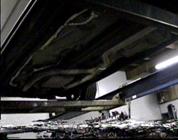
The
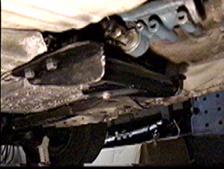
engine was obviously sitting too low in the engine compartment. The crank
pulley/balancer was sitting only a fraction of an inch above the front
anti-sway bar after the K-brace modification. The right steering knuckle
hit the oil pan about ½ inch from the bottom even with the built-in notch in
the stock pan. It was obvious the engine needed to be raised. The
good news about the LT1 is it has a lower deck height than any previous small
block Chevy. So it was an easy fix to add ¾ inch steel spacers to the
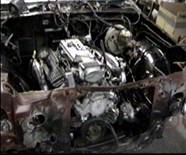
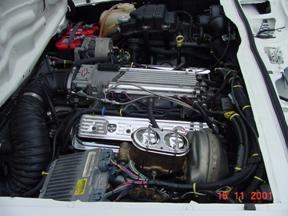
Initial fit-- LT1 in engine bay
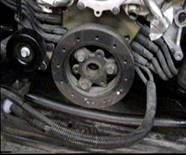
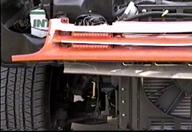
Initial fit—Crank pulley/balancer barely clears front anti-sway bar on Dave’s car

Steering shaft hits stock LH manifold on Dave’s car
Shaft runs over LH #4 tube and through bend in #1 tube
Spacers used to raise Dave’s Beefed-up K-brace- shows
engine on Frame Mounts—Note better clearance on Dave’s
Flaming River Steering Box Crank/Balancer pulley
RH steering knuckle hits oil pan- Steering knuckle clears oil pan after
Dave’s initial fit spacers were added
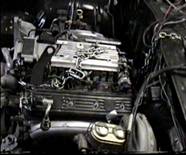
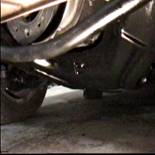
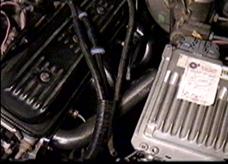
Radiator and Fan
I originally hoped that with
the LT1 Opti-Spark distributor on the front of the
engine rather than the back of the manifold, I could mount the motor further
back and get more clearance for the radiator and electric fans. This
proved not to be the case. With the
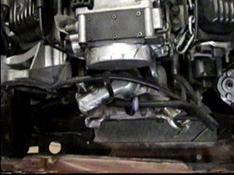
Note there isn’t much clearance between
the core support and all the plumbing
from the water pump
Radiator and SPAL dual 11” fans on Dave’s car
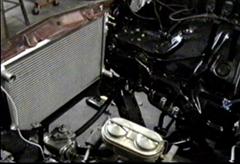
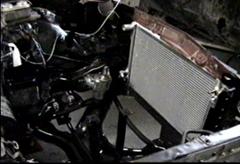
Two views of radiator from behind the core support
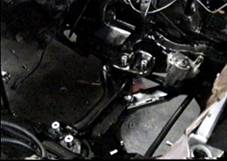
Fit and Clearance- Transmission
Denis St. Pierre and others who have installed 700R4 transmissions in their cars have posted extensive descriptions of how they modified their crossmember mounts to accept the longer transmission. That served as a starting point for our car, but Ron at Lone Star Chassis decided it would be just as easy and cost-effective to fabricate a new crossmember that bolted into the last two existing holes in the crossmember mount rather than cutting up the chassis pan around the tunnel. The new crossmember looks like it came from a Russian tank factory—it’s stout! It uses the stock Monza TH-350 transmission mount. The bigger 700R4 fits in the larger ’75 and later H-body tunnel just fine. The larger speedometer pickup with Vehicle Speed Sensor adapter was too close to the tunnel to allow the stock speedometer cable to hook in because of the large radius bend, but adding a short cable allowed a tighter radius and mated with the pickup correctly. I am using a $65.00 kit from Howell Engine Developments to control the lock-up converter using engine vacuum and a 4th gear pressure signal to tell the converter to lock up. I needed to adapt the 700R4 to use the ’76 Torque Arm with the three-link suspension. I found an ‘82-’92 Camaro/Firebird 700R4 tail housing with provisions for a torque arm for $10.00 at a local transmission shop. Although the bolt pattern for the H-body torque arm mount is different, you can rotate the mount clockwise 90 degrees and use the upper and lower bolt holes in the tail housing to mount to the first and third holes in the Vega mount. Since the torque arm and driveshaft have to be shortened about six inches anyway, you could get a ’82-’92 Camaro/Firebird torque arm and mount, cut it, and weld the front part of the F-body torque arm and mount to the back half of your H-body torque arm to have the use of the correct bolt pattern for the tail shaft. The ’78-’80 Monza Town Coupe and GM clones used the same tab-type front mount as the later F-bodies, but that would also have to be shortened and re-welded.
Transmission mount and F-body Looking forward from transmission- Note
tail housing in Dave’s car- used an empty case for initial fit!
Note speedo/speed sensor the LH header collector flange
Strengthening and Reinforcement
One of my concerns from talking
to many folks is “frame spreading” over time, due to increased weight and lack
of re-enforcement. This pushes the car out of alignment and prevents
re-aligning it unless you swap upper A-arms, go to modified bushings, or get
the frame straightened. Tim McCabe came up with a neat fix—remove the two-piece lower K-brace under the crank balancer,
re-enforce it by welding steel bar in the channels, weld it into one solid
piece, and weld washers into the slotted bolt holes to make them round, so
there can be no movement. I had my K-brace modified and beefed up like
this, so I hope to prevent the dreaded spread over time. If your car has
already experienced this, Tim recommends dropping the center link, wrapping a
chain around the right sub-frame rail, connecting it to the pitman arm, and
cranking the steering hard left to draw the frame rails together. Then
install the modified K-brace with the washers welded in the most restrictive
(inside) position of the slots. Butch
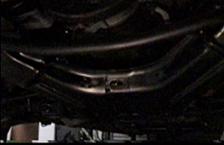
Beefed-up K-brace—
welded into one solid piece,
reinforced, slotted bolt holes made round
on Dave’s car
Accessory Belt and Pulley Mounting
A major concern is the serpentine belt routing to drive the alternator. LT1 Camaros and Firebirds came with the alternator mounted in front of the right cylinder head, the A/C compressor mounted on the lower right corner, the power steering pump between them, and a tensioner to the right of the balancer. It is impossible mount an A/C compressor in the stock position without hitting the right frame rail right where the steering mounts. (There was a 1LE A/C delete pulley offered ’93-‘94 early cars, but the outside radius of the pulley hits in the same place.) The only two aftermarket solutions I found are from March or Street and Performance and cost between $500.00 and $600.00 depending on whether or not you want A/C, and require using a specific alternator. Also, I am not certain the alternator and compressor wouldn’t sit too high for hood clearance in an aftermarket setup. We chose to fabricate a new setup that duplicates the stock belt routing from the crank pulley to the alternator, but fits within the front profile of the engine. It cost about $280.00 in parts and labor. I may look into an aftermarket setup in a couple years (I still have fantasies about getting a Vintage Air A/C system in the car.) but for now I’m happy with a reliable setup that works.
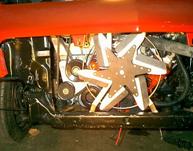
Fabricated idler pulley on plate Tony Hallo’s similar fan and pulley
mounts to power steering pump setup shows idler pulleys on aluminum plate
bosses
Electronics
Tim McCabe suggests you not undertake a TPI or LT1 conversion unless you have a thorough understanding of what each sensor does in the system. While this sounds like you have to have a degree in electrical engineering, this really isn’t as overwhelming as it sounds. Basically, the program attempts to maintain a 14.7:1 air/fuel ratio whenever the engine is in “closed loop” mode. Generally speaking, this is any time other than when the engine is first warming up or at wide-open throttle. This is determined by a closed data loop in which the MAF or MAP provides pressure data to the computer and the oxygen sensors tell the computer what the air/fuel ratio is. The computer determines the injector pulses and ignition timing based on inputs from the oxygen sensors and MAF and/or MAP using a look-up table, but then fine-tunes it based on inputs from the inlet air temperature sensor, knock sensor, and engine coolant temperature sensor. There is an excellent explanation of how a typical EFI system works contained in the beginning of the DFI Training Manual on the ACCEL website under the EMIC heading. Other aftermarket vendors also have similar (but less detailed) information, such as Fuel Injection Specialties and Ron Francis Wire Works.
Selecting a computer and engine
wiring harness is a critical decision. You can get an engine complete
with computer, harness, and sensors. I was not so lucky, and had to
purchase a computer and have it programmed, a wiring harness, and several
sensors. Even if you get a complete setup, you may still want an
aftermarket harness and custom computer program. Basically, there are
three types of computers. The ’92-’93 Corvette and ’93 F-body (Camaro/Trans Am) use a computer with a removable
programmable chip (PROM). The early LT1’s also use a “batch fire” system
for the fuel injectors, where the bank of injectors shoots the fuel all at once
rather than sequentially, as in the later system. Also, the early engines
do not use a Mass Air Flow (MAF) sensor, but rely instead on Manifold Absolute
Pressure (MAP) and lookup tables in the computer program to meter the fuel/air
ratio. The ’94-’95 computers do not have removable chips, but are reprogramable. These contain Onboard Diagnostic
Equipment I (OBD I) technology to monitor the status of the computer and
sensors. The post ’93 computers are also programmed for the Vehicle Anti-Theft
system, which must be disabled if you don’t use an ignition lock and key with a
special anti-theft chip. Tim McCabe also builds a black box to bypass the
VATS system on most GM fuel injection systems. He says “I have not tried it on
an OBDII system, but it works on all the '86-'94 units. It's a simple
3-wire hook up. Let me know if you know anyone who is looking for one. I charge
$50.00 US and it has a 1-year warranty. It's a lot cheaper then getting a new
PROM burned without the VATS.”
The ’94 and later engines use
sequential fire fuel injection; each injector shooting fuel in correct
order. They also have a Mass Air Flow sensor that uses air volume across
a sensor to signal metering of the fuel/air mixture. The MAF sensor is
one of the highest replacement frequency parts in the system; also the most
expensive at over $275.00. It also takes up a lot of space under the
hood. The MAP sensor is still used, but as a secondary or backup to the
MAF sensor. The third type computer uses OBD II technology and is not reprogramable; so if you use this computer, it’s best to
match your engine to the stock ’96-’97 configuration. You also must have
the Vehicle Anti Theft System (VATS) disabled. There are several
aftermarket performance companies who will sell you a reprogrammed chip or
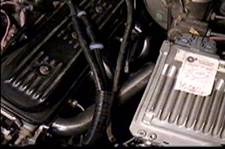
computer and engine wiring harness. I wanted a sequential-fire system,
but did not want the problems or expense of a MAF sensor. Two companies
offer this configuration; Street and Performance of
Silver box in front of brake master cylinder is computer
Fuel System
A TPI or LT1 EFI system
requires a high-pressure (50 p.s.i. or greater) fuel
pump with a supply and return line from the tank. Normally, the supply
line should be 3/8” minimum diameter and the return line should be 5/16” minimum
return diameter. You can use an in-tank pump or an in-line pump for
supply pressure. I wanted to replicate a factory LT1 system as much as
possible. I bought a complete Camaro fuel tank;
fuel line harness and fuel pump from Regal Performance in
Exhaust
Once everything was fitted into
the best location in the engine bay, the engine was pulled again, final
modifications made to the LH firewall and everything was bolted or welded in
place. While the engine was out I sent the headers to Performance
Coatings in
LH and RH Headers after Ceramichrome Coating. Note ding in back LH tube for
steering shaft clearance
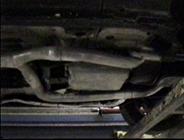

Y-pipe from Headers Exhaust System Flowmaster Muffler and
3” Tailpipe with Monza
Note restored fuel tank
Air Induction
There are several ways to get air into your throttle body, depending on how creative you are and whether or not you use the Mass Air Flow (MAF) sensor. The easiest approach is to clamp an aftermarket filter like a K&N cone filter right on the throttle body, but this draws hot air from behind the radiator. (If you do this, don’t forget to provide an alternate location for the air temperature sensor.) I used a new 90-degree elbow from a 1LE (A/C delete) Camaro ($78.99 from GM Goodwrench—includes Inlet Air Temp sensor and clamps) with some $20.00 flexible ducting and aluminum sleeves to route cold air from the original air inlet location in the left side of the radiator core support, then mounted a K&N filter ($45.00 from Jegs) in front of the core support. Similar aftermarket kits for F-body and B-body cars are available that supposedly offer a 30 HP increase at the rear wheels and cost over $200.00; but we fabricated this setup for $50.00 less than that. With a good cold air setup, headers, and free-flowing exhaust, I expect to take the otherwise stock engine from 285 HP to over 300 HP.

Front without sheet metal: Cold Air Ducting to Front LT1 All Set To Go!
Note K&N Cone Filter, of Core Support
SPAL Pusher Fans
When we put the filter on the left side of the radiator, it completely filled up the area where the turn signal housing sits behind the plastic grille. We considered moving the filter, but decided that was the right location; so the next solution was to modify the turn signals. I cut off the back of the turn signal housing behind the amber lens, shortened the lens to eliminate interference with the bottom of the filter and epoxied two 4” x 3/8” amber LED light bars from Ron Francis Wire Works (http://wire-works.com) to the front of the lens so they fit between the slats in the grille. These cost $19.00 each. The LED turn signals were attached with cleat RTV silicon to the old lenses and test-fitted fitted into an old grille. I wired them in using GM Weatherpak 3-pin connectors so they can be easily removed without cutting wires. They look and function great and leave room for the big K&N Filter in front of the core support. Talk about a “giant sucking sound”—at idle the engine pulls a lot of air! I’m glad the filter is out of the engine compartment where it can draw cool air.

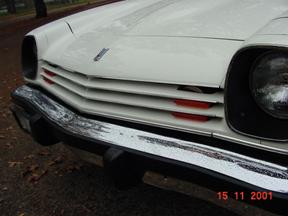
LED Turn Signals and Parking Lamps Air Filter and LH LED’s
Rear End and Brakes
I originally planned to run the
existing Vega 6 ½” rear end for a while, but I decided it would cost more to fix
the car after it blew and I didn’t want to be stranded on the side of the road
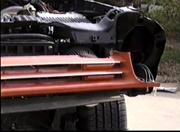
in the middle of nowhere. I got a 7 ½” rear from a ’80
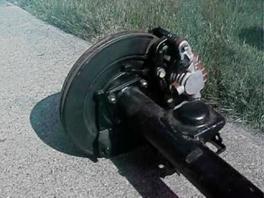
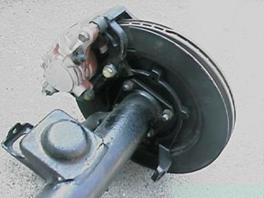
Rear End with custom 28-spline Moser axles and ’98 Blazer
12-inch rear disk brakes
I replaced all the rear control arm and torque arm bushings with Energy Suspension polyurethane bushings. These are available in a kit, #4-3141, from Suspension Restoration (www.suspension.com) for $42.00. Finally, I had the lower control arms reinforced by welding 1-inch rectangular tubing into the channels as recommended by Robert “12 Second Vega” Herndon.
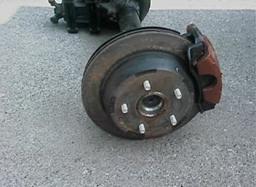
Front End and Brakes
I did a complete front
suspension rebuild during the initial restoration; swapping the deep pocket
lower A-arms, front anti-sway bar, spindle, vented rotors, calipers, and V-6
springs from a ’78 Sunbird wagon for my stock non-GT parts. I replaced
the bushings and ball joints at that time as well. My car came with power
brakes, and I retained the stock booster without any clearance problems.
I originally bought beefed up 5-lug Monza rotors from Dave’s Vega Village rather
than doing the S-10 spindle, rotor, calipers, and ball joint adapter. But when
I went to 12-inch rear disk brakes, these were too small to keep the brake
system balanced. After consulting with “Vega Man” Larry Heagren, I decided to upgrade the front brakes and the increase
the system capacity as well. I used Bob Gumm’s
ball joint adapters, S-10 front spindles and rebuilt calipers, a rebuilt ’76
Cadillac Eldorado “Turbo Boost” disk brake master
cylinder, and its matching proportioning valve. The master cylinder is 3”
x 5 ¾” and about ½” deeper versus the 2 ¾” x 5” one in the Vega now so it adds
about 50% additional fluid capacity. It bolted up to the stock Vega power
booster with no additional modification. I got Autospecialty
Power Stop cross-drilled and vented S-10 front rotors from Summit Racing
($65.00 each) with VGX metallic pads. These are about ¾” bigger than the
I replaced the used V-6 Sunbird springs with new Moog CS 5576 V-8 Monza springs. My first impression was these were way too stiff, but once I got all the sheet metal and front bumper on the car, the rate was much better; firm but quite acceptable for better handling they provide. I didn’t have to cut them and the ride height is just about perfect. With CC-617 variable rate rear springs and ½ inch rubber isolators installed the car looks very balanced.
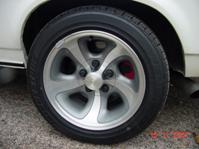
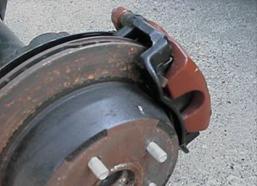
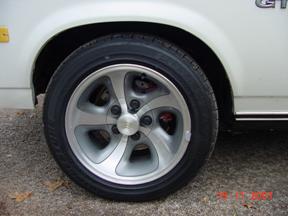
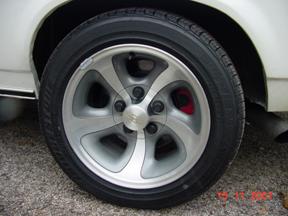
Front and rear wheels and disk brakes
Steering
Since the steering wheel was
coming out anyway, I decided to swap to a tilt column in order to make header
changes and engine pulls easier in the future. Butch
Gauges and Indicators
I want my interior to appear as close to original stock Vega as possible, but wanted to upgrade the gauge package. I got a set of three Auto Meter mini (1 ½”) electrical gauges from Jeg’s, catalog # 105-2391. I previously enlarged the voltmeter and temperature holes in my GT dash to fit a set of 1 ½” mechanical gauges. I wired the water temperature and voltmeter gauges directly through the firewall rather than through the fuse block. The LT1 has two coolant sensors; one on the water pump plenum that talks to the computer, and a single-wire sensor on the left head. I replaced that one with the electrical sender for the Auto Meter mini coolant temperature gauge. The stock Vega clock is worthless; besides my Delco sound system has a digital clock, so I put an Auto Meter mini electric oil pressure gauge wired through the firewall to an oil pressure sender on the fitting at the back of the LT1 intake manifold in place of the clock. The mechanical speedometer pickup on the transmission is modified with a vehicle speed transducer, but lets me use a stock cable-driven 120 MPH Vega GT speedometer. Tim McCabe modified an 8000-RPM Cosworth tach for my V-8. It connects through the firewall to a tach output wire from the computer and wiring harness. Using the Vega fuel sender allows me to use a stock fuel gauge. I retained the stock idiot lights. Be Cool built my radiator with provisions for the stock Add Coolant sensor. I also added a Check Engine light that is built into the computer and wiring harness to monitor the status of the LT1 electronics. This went in the hole for the clock stem next to the oil pressure gauge.
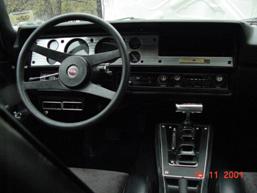
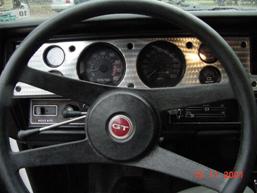
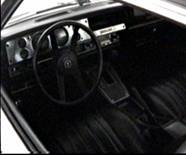
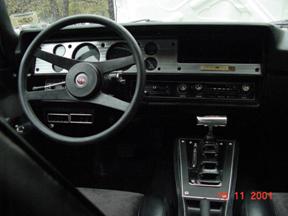
Vega GT dash with Cosworth turned-metal bezel, Autometer Gauges and amber
Check Engine light in old clock stem hole. Modified B&M Console Megashifter for
71-82 Camaro.
Interior
The car originally had a white
interior. Anybody who has owned a 20-plus year-old car with a white
plastic interior can attest that it oxidizes in the sun quicker than just about
any other color. Mine was more like Styrofoam than polystyrene—rubbing it
turned it into powder. This can be attributed to lower carbon content in
white plastic. Most of the black pieces and many of the saddle beige
color pieces I’ve found are as flexible as the day they were molded and only
suffering from a few dings and scratches. My white vinyl driver’s seat
was also shot. I gradually collected a set of black plastic panels, most
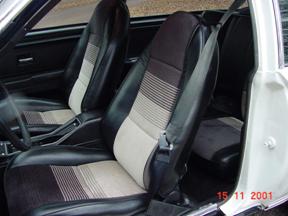
of which came from Butch Davis. Classic Trim of Abilene made a set of
black vinyl seat skins with cloth velour inserts from early ‘90’s Camaro fabric that fades gradually from black to medium
gray. This cost around $700.00 for front and rear seats. I might
have been able to get a different reproduction OEM pattern cheaper, but decided
to go with something I thought would look good without detracting from the
near-original appearance of the car. The velour inserts should add to the
visual appeal and offset the black interior against the white exterior and be
comfortable than solid vinyl in the

New seat with velour inserts
Working Out the Details
When it was finally time to drive the car back from the chassis shop, there were still some bugs to work out. The engine was idling very high, around 1500-1800 RPM. We checked out the Idle Air Controller, but it wasn’t the problem. Ron could reset the IAC to where the engine would idle at 600 RPM with a sensor tester when not connected to the computer. Once the plug from the computer was hooked up, the idle speed went back up to over 1500 RPM. Also, we found the EGR solenoid lead from the computer was missing from the harness. I called Howell Engine Developments and spoke to the technician who built the harness. We determined the wires from the computer were reversed in the weather pack connector to the IAC. He immediately sent out a pigtail lead to correct the wiring to the IAC and a sub-harness to connect the EGR solenoid to the computer. Later, they replaced the entire harness with a correctly wired one.
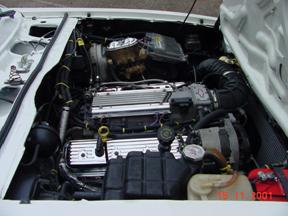
While waiting to save enough to finish the paint and bodywork, I detailed out the engine compartment— rerouting and wrapping wire harnesses and hoses, cleaning and painting, and adding a Bow-Tie throttle body plate, chrome valve cover caps. I installed the body panels temporarily to evaluate the cooling system with everything closed up. I drove the car and let it idle on a 100-degree day and the gauge never went over 210 degreees.
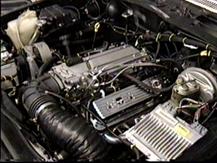
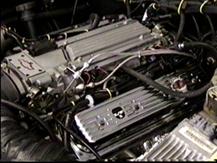
Dress-up throttle body plate and chrome valve-cover caps
Note the LT1 and bow tie logos
The Finished Product
Royce Collision
Center
Driving Impressions
The engine starts flawlessly and
idles smoothly around 600 RPM. At idle on a hot day the fans kick on at
190, and then run until the temperature drops to 185. WOW-- Does this car
accelerate! Since I bought the transmission used, I didn’t know everything
about its history, but the previous owner must have put in a shift kit—it
really kicks from 1st to 2nd. With the weight of
the front sheet metal, bumper, and hardware the 5576 spring rate is much tamer
than I originally thought and the ride height is very balanced front and
rear. With polyurethane bushings on the front and rear control arms, the
torque arm, and the front sway bar, it’s a little squeaky but the car feels
tight and handling is excellent. The 4-wheel power disk brakes are
incredible—it stops quickly, straight, with no skidding or diving. The
proportioning is perfect; the rear has never locked up before the front brakes
grab. The temperature gauge runs around 150 at highway speed, and I get
an honest 20-MPG while cruising at 2400 RPM at 70 MPH.
Willie, the White Wonder Wagon,
has been transformed into Willie, the LT1-der- a rocket on rails!
Update: Summer, 2002
Anyone with a V-8 H-body can tell you that sub-frame connectors are a worthwhile investment in the structural integrity and handling response of your car. The only aftermarket option is the Chris Alston boxed sub-frame connectors, but they involve cutting the floor pan of the car near at the rear seat pan. I found out Lone Star Chassis could fabricate and install a set of full-length tubular chrome-moly sub-frame connectors for around $300.00. They did a fantastic job tying them in at the front and rear, as well as along the length of the rocker panel. This virtually eliminates body flex from the torque of the LT1 and aggressive driving. At the same time, I decided to have the rear control arms reinforced in the channels and boxed.
Because my radiator doesn’t have a built-in transmission cooler, I was concerned about whether I had addressed transmission cooling adequately. So in July I added a deeper Derale steel transmission pan with cooling tubes (about $78.00 from Jegs’s or Summit) to provide supplemental cooling. I also went to a stronger reinforced aluminum rear-end cover. It wasn’t quite as expensive ($59.00 on eBay) as the bearing cap stud models, but it’s stronger that stock due to having a thick strap across the cross-section. It also promotes better cooling due to the finned construction and provides over a pint more gear lube capacity. I’m running Valvoline synthetic which exceeds specs for the Torsen rear differential.
Never say
never— Sherman Wright kept telling me I needed power steering. I
originally ruled out power steering in my car, but after hard-cranking the
manual
oversteer considerably. The steering and handling is greatly improved with these mods, but I’m looking to go the next step to an AGR 12:1 power steering box in a couple months to improve the steering even more.
2003 Update
I wanted to do some work on the
car while sitting on call for UPS, so I drove 1000 miles to
Problems and Fixes
-Rear End: After about
10,000 miles since the rear end was put together, a grinding noise started
coming from the center section. As time progressed, it started to get
worse. I tried changing the gear lube and adding friction modifier, but
it continued to get worse. Through one of the local car clubs, I was able
to find a 4-wheel drive shop in
- Flex Plate Vibration: About the same time the rear
end problem began, I started noticing a vibration that occurred around 800-1200
RPM. The vibration occurred whether in Park, Drive, Neutral or Reverse;
whether or not the car was parked or moving. It didn’t seem too severe,
so I decided to drive the car back to Texas Texas Jackson ,
Tennessee Memphis Texas , I decided to
take the car back to Louisville
- Alternator Failure: In the middle of all this, my volts went from 12-13 down to 11-10. The multimeter confirmed it—bad alternator! This was a pretty routine fix, but I want to note a couple things about LT1 alternators for anyone doing a swap or replacing theirs. First, there are two stock alternators for the F-body LT1; the 1993 car used a 124-amp alternator, and the later cars used a 140-amp alternator. Do not assume they are perfectly interchangeable; the right rear mounting boss is in a different position on the back of the case. If you swap alternators, you will need a different mounting bracket that goes from the exhaust manifold to the right rear of the alternator. The 140-amp alternator also uses a larger bolt in that position than the 124-amp model. Second, if you are looking for an aftermarket alternator as an alternative to the OEM remanufactured replacement, expect to spend over $200 and up to $265 if you want a chromed alternator. After trying the 140-amp AC/Delco ($148 with exchange) and finding it wouldn’t just bolt in, I went with a remanufactured 124-amp Pro Start from Pep Boys with a lifetime warranty for $110 (with exchange). Since many remanufactured alternators have a lifetime warranty and are relatively high-amp models, I think they are a better value than aftermarket models.
- Dash Update: I decided the appearance of my dash was a bit too “busy” and it needed to be cleaner. I wanted to go back to the “stock GT” appearance: no wood grain, no silver trim, just white letters on black. Since it was glued on, I couldn’t just pull the wood grain trim off without leaving damaged plastic. I found another perfect dash carrier on eBay, and swapped the two dash carriers. I like the cleaner look and found that it also lined up better.
Even though I had to deal with a lot of problems, they resulted in major upgrades to the car. I was able to balance out the fuel mixture and get the car to run cleaner, strengthen the 10-bolt rear end, upgrade the flexplate and finally replace the torque converter with a high-stall converter, replace the alternator and and replace the dash. Frustrating; but in the end the car is better than before!
Future Plans
A Painless Wiring 18-circuit universal street rod wiring harness may eventually replace the original Vega wiring which by now has been extensively modified and spliced.
My ultimate street rod would have air conditioning. It appears there is just enough room between the frame for the SPAL fans and the radiator for a condenser. Once I see how well the engine cooling setup works this summer, I may try putting a condenser between the fans and radiator and see how it affects cooling. Another option is removing the SPAL fans and trying Flex-a-Lite dual pancake fans behind the radiator in order to free up space for the transmission cooler and an A/C condenser in front of the radiator. If either of these work without making the engine run too hot, the next step would be to add air conditioning. This would require new March outward-mount accessory brackets, A Sanden 508 R-134 compressor, probably a new alternator, and a Vintage Air compact heat/AC/defrost evaporator in addition to the condenser, lines, and accumulator. For now, I want to see how my current setup does this summer; but if I can figure it out I definitely want A/C in the car in the future.
Maybe Someday…
How about porting the LT1 heads? Better yet, how about converting to LT4 heads, valve train and cam? That would require a bigger throttle body and injectors. All that torque will probably explode my S-10 rear end, so I would probably need either a narrowed 12-bolt or custom 9” with a torque arm setup. Might as well upgrade the torque arm and beef up the rear trailing arms at the same time! The list is only limited by imagination, time, and money. Keep checking back at www.H-body.org-- I’ll keep you posted!
Vendors Used
-
- Auto Meter: Electric Oil, Temperature, and Volt Gauges
- Autospecialty: Power Stop cross-drilled and vented S-10 front rotors
- Auto Zone: S-10 Front Brake Calipers
- B&M Transmission Products: Trans Fluid Supercooler, 70-81 F-body Console Megashifter
- Be Cool Radiators: Custom Reverse Flow 2-Row Aluminum Radiator, Dual SPAL Fans
- BF Goodrich: 205-60HR-14 Tires
- Bridgestone:
205-55HR-15
- Butch
- Classic Trim of Abilene: Upholstery, Rear cargo mat
- Dave’s
- David’s Auto Salvage: Body Panels, S-10 rear axles, front spindles, drums, and yoke, LT1 power steering pump and lines
- Derale Cooling Products: Deep steel transmission pan with cooling tubes
- Don Hart Radiator Service: Fuel Tank Restoration and Fabrication
- Energy Suspension: Polyurethane suspension bushing kit, Sway Bar Mount and End Links, Transmission mount
- Fain’s Automotive: 700R4 Transmission, AM/FM Cassette Deck, Front and Rear End Modification and Assembly
- Flaming River: Aluminum Quick-Ratio Steering Box
- Flowmaster: 40-series muffler
- FM 600 Wrecking: Body Panels, A-arms, Anti-Sway Bars, Monza 7.5” Rear End Housing, Monza Spindles and Brake Calipers, Pontiac Rally II Wheels, Astre power steering box
- GM Goodwrench Parts: Impala SS Fuel Supply and Return Lines, Fuel Filter, 1LE Air Inlet Elbow, Parking Brake Cables, Miscellaneous Wiring Connectors
- Howell Engine Developments: Computer, Wiring Harness, Sensors, Fan Control Wiring Kit, Torque Converter Lockup Kit
- K&N: 600 CFM Cone Air Filter
- Lokar: Throttle and Transmission Cables, Throttle Body Brackets
- Lone Star Chassis: Fabrication and welding
- Moog: Front V-8 and Rear Springs, P/S Center Link, offset upper control arm bushings
- Moser Engineering: 28-spline custom rear axles
-
- National Drivetrain: 3.42 Bow Tie Eliminator Ring and Pinion Gears
- Performance Coatings (
- Performance Torque Converters (PTC) 2400-2800 stall 700R4 Lockup converter, 153-tooth externally-balanced HD Flexplate
- Regal Performance: LT1 Fuel Tank, Fuel Vapor Canister and Lines, LT1 Fuel Pump, Alternator, Flywheel/Flexplate, Lots of Advice
- Ron Francis Wire Works: LED Turn Signals, Flasher, Indicator Lights
- Sanderson: CC-13HO Headers
- The Muffler Shoppe: 3” Exhaust Fabrication
- Tim McCabe: V-8 Tach Recalibration
- Tom Lippert: Dash Trim, Wiring, Cosworth Speedometer and Tach
- Torsen: F-body Limited-slip Torque Sensing Rear Differential
- Tuned
Port Injection Specialties (TPIS): 160 deg. Thermostat, Throttle Cable
Stud, Oxygen Sensor Bungs,
- V8monza.com (Bob Gumm): S-10 Ball Joint Adapters
- VGX: Metallic Brake Pads